BIOS Updates on the Servers
Below are the steps for updating the BIOS on the Application and Monitor Servers. We provide instructions for Intel and ASUS NUC devices, in accordance with our hardware recommendations. You should also update the BIOS on other computers such as the Admin Workstation, but those instructions will vary depending on the manufacturer and model of your device.
What you need
A clean USB device to download the BIOS file
An Internet-connected workstation, such as the Admin Workstation
A UPS (uninterrupted power supply), such as a surge-protecting power supply with a backup battery (This is not required, but strongly recommended)
A keyboard and monitor
Perform Backups
If you are updating the BIOS on an existing SecureDrop system, we recommend you back up the Application Server before proceeding.
Prepare the USB Stick
Using the Disks application, delete existing partitions on the USB device, if applicable, and reformat the entire device with one FAT32 partition. Note that you will lose access to all existing data on this USB stick.
Download and Verify Appropriate BIOS Files
For Intel and ASUS NUC Devices
Check the make and model of your servers, and follow the F7 BIOS update method in the documentation. The exact instructions vary by model:
BIOS update instructions for Intel NUC with Intel Visual BIOS
BIOS update instructions for Intel NUC with Aptio V UEFI Firmware Core
Each make and model of NUC will offer different file types; proceed to either the Intel or ASUS Download Center and download the file indicated in the documentation for the F7 method (e.g., .bio or .cap).
Warning
Do not download BIOS updates from anywhere other than the manufacturer’s website. Be sure that you are on the correct website and that it has a valid SSL Certificate. Intel’s SSL Certificate is issued to *.intel.com and signed by DigiCert. ASUS’ SSL Certificate is issued to *.asus.com and signed by Amazon. Be sure you download the files specific to the model of your servers.
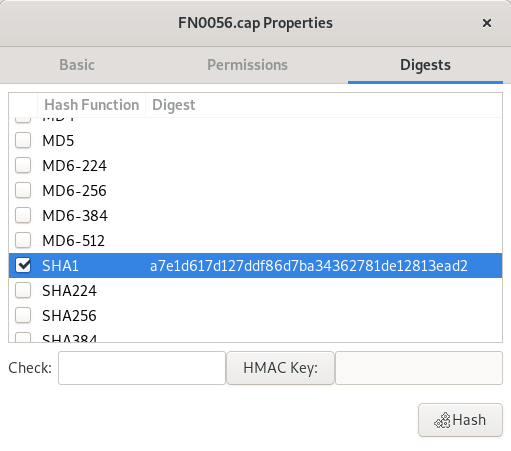
Intel provides an SHA1 checksum on the download page, while ASUS offers a SHA-256 checksum. Once you have downloaded the file, using the Files application, browse to the file, right click and select Properties ▸ Digests, select either SHA1 or SHA256 depending on which is available to you, and click Hash. Compare the result in the Digest column to the checksum listed on the manufacturer’s website. If these two values do not match, do not proceed, and contact support@freedom.press. Tails provides a detailed explanation of this process. (Note that the hash in the screenshot below is an example only, and will not match your specific file.)
Once you have verified the hash, copy the file to your USB device.
Update the BIOS
Power off the Monitor Server. We recommend plugging it into an uninterrupted power supply (UPS). Plug in the keyboard, monitor, and USB key, and power on the server, then press F7 when prompted to enter the BIOS Update tool.
Select the USB device and navigate to the file you have downloaded, then hit Enter. The update will take several minutes–do not interrupt the update or unplug the server during this time.
Repeat these steps on the Application Server.