Migrating from a Tails-based SecureDrop
Pre-install tasks:
Apply BIOS updates and check settings
Download and verify Qubes OS
Install Qubes OS
(Hardware-dependent) Apply USB fixes
Apply updates to system templates
Install tasks:
Copy the Submission Key
Copy Admin Interface details
Copy SecureDrop login credentials
Download and install SecureDrop Workstation
Configure SecureDrop Workstation
Test the Workstation
Prerequisites
In order to install SecureDrop Workstation and configure it to use an existing SecureDrop instance, you will need the following:
A Qubes-compatible laptop based on the hardware recommendations.
Qubes installation medium - this guide assumes the use of a USB 3.0 flash drive. Qubes may also be installed via optical media, which may make more sense depending on your security concerns.
Note
A USB flash drive with a Type-A connector is recommended, as USB-C ports may be disabled on your computer when the BIOS settings detailed below are applied.
A working computer (Linux is recommended and assumed in this guide) to use for verification and creation of the Qubes installation medium.
Note
Tails can be used to perform the tasks below, but due to the size of the Qubes installation ISO, it may make sense to download it on another computer rather than via Tor, and then to use a USB flash drive to transfer it to Tails for verification and creation of the installation medium.
A password manager or other system to generate and store strong passphrases for Qubes full disk encryption (FDE) and user accounts.
A basic knowledge of the Qubes OS is helpful.
Pre-install tasks
Apply BIOS updates and check settings
Before beginning the Qubes installation, make sure that your Qubes-compatible computer’s BIOS is updated to the latest available version. For more details about this process, see the section on Automatic BIOS updates.
Once the BIOS is up-to-date, boot into the BIOS setup utility and update its settings. Note that not all BIOS versions will support the items listed, but if available following changes are recommended:
Ensure the internal clock is correct.
Set a password to access the BIOS (and record the password in your password manager).
Disable BIOS downgrades.
Enable Data Execution Prevention.
Enable virtualization support (required for Qubes OS). - for Intel-based devices, Intel VT-d and Intel VT-x should be enabled - for AMD-based devices, AMD-VI and AMD-V should be enabled
Disable unnecessary I/O options such as Wireless WAN and Bluetooth.
Disable unnecessary network options such as Wake-on-LAN and UEFI network stacks.
Disable Thunderbolt ports, or any other ports that allow Direct Memory Access (DMA).
Enable any physical tamper detection options.
Disable Computrace.
Disable SecureBoot.
If the Qubes hardware compatibility list entry for your computer recommends the use of Legacy Mode for boot, change that setting in the BIOS as well.
Disable SecureBoot
SecureBoot is a feature available on most systems that, when enabled, does not allow any operating system to boot that has not been signed by a trusted key. By only booting to operating systems that are properly signed, you can be sure that the OS itself has not been corrupted or tampered with, at least at the boot level.
SecureBoot must be disabled on the server and Workstation hardware. SecureDrop installs a hardened, security-focused version of the Linux kernel (grsec) that does not support SecureBoot. If SecureBoot is enabled on either of the servers during the install, you will receive a pre-install error reminding you that it must be turned off before the installation can proceed.
Likewise, SecureBoot is not fully supported by Qubes OS, and cannot be used with SecureDrop Workstations.
For instructions on how to enable or disable the SecureBoot feature for your device, please consult the manufacturer’s manual for BIOS settings, as they differ for each make and model.
Download and verify Qubes OS
On the working computer, download the Qubes OS ISO and cryptographic hash values for version 4.2.4 from https://www.qubes-os.org/downloads/. The ISO is 6.8 GB approximately, and may take some time to download based on the speed of your Internet connection.
Follow the linked instructions to verify the ISO. Ensure that the ISO and hash values are in the same directory, then run:
gpg --keyserver-options no-self-sigs-only,no-import-clean --fetch-keys https://keys.qubes-os.org/keys/qubes-release-4.2-signing-key.asc
gpg -v --verify Qubes-R4.2.4-x86_64.iso.DIGESTS
sha256sum -c Qubes-R4.2.4-x86_64.iso.DIGESTS
The output should look like this:
gpg: requesting key from 'https://keys.qubes-os.org/keys/qubes-release-4.2-signing-key.asc'
gpg: key E022E58F8E34D89F: public key "Qubes OS Release 4.2 Signing Key" imported
gpg: Total number processed: 1
gpg:               imported: 1
gpg: no ultimately trusted keys found

gpg: armor header: Hash: SHA256
gpg: original file name=''
gpg: Signature made Mon 17 Feb 2025 12:00:00 AM EST
gpg:                using RSA key 9C884DF3F81064A569A4A9FAE022E58F8E34D89F
gpg: using pgp trust model
gpg: Good signature from "Qubes OS Release 4.2 Signing Key" [unknown]
gpg: WARNING: This key is not certified with a trusted signature!
gpg:          There is no indication that the signature belongs to the owner.
Primary key fingerprint: 9C88 4DF3 F810 64A5 69A4  A9FA E022 E58F 8E34 D89F
gpg: textmode signature, digest algorithm SHA256, key algorithm rsa4096
Qubes-R4.2.4-x86_64.iso: OK
sha256sum: WARNING: 20 lines are improperly formatted
Specifically, you will want to make sure that you see “Good signature” listed in the text. If it does not report a good signature, try deleting the ISO and downloading it again.
Once you’ve verified the ISO, copy it to your installation medium - for example, if using Linux and a USB flash drive, using the command:
sudo dd if=Qubes-R4.2.4-x86_64.iso of=/dev/sdX bs=1048576 && sync
where if is set to the path to your downloaded ISO file and of is set to
the block device corresponding to your USB flash drive. Note that any data on the USB flash drive will be overwritten.
Caution
Make sure to verify that you have the correct device name using, for example, the lsblk command. You should write to the full device (eg. /dev/sdc) rather than to a partition (eg. /dev/sdc1).
Install Qubes OS (estimated wait time: 30-45 minutes)
- Before starting the installation, please ensure that:
the computer is charging
all USB devices like YubiKeys, mice and keyboards are disconnected
To begin the Qubes installation, connect the Qubes installation drive you just created to your target computer and boot from it. You may need to bring up a boot menu at startup to do so - on Lenovo laptops, for example, you can do so by pressing F12 on boot.
Follow the installation documentation to install Qubes on your computer, ensuring that you:
Use English - United States as the setup language. (This requirement will be dropped in a future version).
Use all available storage space for the installation (as the computer should be dedicated to SecureDrop Workstation).
Set a strong full disk encryption (FDE) passphrase - a 6-word Diceware passphrase is recommended.
Create an administrative account named
userwith a strong password.
Note
Qubes is not intended to have multiple user accounts, so your account name and password will be shared by all SecureDrop Workstation users. The password will be required to log in and unlock the screen during sessions - choosing something strong but memorable and easily typed is recommended!
Once the installation is complete, you will be prompted to reboot into Qubes. Reboot, removing the install USB flash drive when the computer restarts.
You will be prompted to enter the FDE passphrase set during installation.
After the disk is unlocked and Qubes starts, you will be prompted to complete the initial setup. Click the Qubes OS icon.
On the configuration screen, ensure that the following options are checked:
Default Template should be set to Fedora 43 Xfce
Create default system qubes (sys-net, sys-firewall, default DispVM)
Make sys-firewall and sys-usb disposable
If there is a grayed out option “USB qube configuration disabled”, make a note of this. An additional setup step will be required (see next section).
Finally, click Finish Configuration to set up the default system templates and app qubes.
Once the initial setup is complete, the login dialog will be displayed. Log in using the username and password set during installation.
(Hardware-dependent) Apply USB fixes
If, during the installation, you encountered the grayed out option “USB qube configuration disabled”, you must now create a qube to access your USB devices. If you did not encounter this issue, you can skip this section.
To create a USB qube, open a dom0 terminal via  ▸
▸  ▸ Other Tools ▸ Xfce Terminal.
Tip
For quicker access, you can add the dom0 terminal to the “Favorites” section of the
Qubes menu (identified by a bookmark symbol). Right-click the entry and select
Add to favorites. To remove it at a later time, right-click the entry in your
list of favorites and select Remove from favorites.
Run the following command:
sudo qubesctl state.sls qvm.sys-usb
After the command exits, confirm that you see an entry “Service: sys-usb” in the Qubes menu. If sys-usb is not running, you can start it with the command qvm-start sys-usb in dom0. Once sys-usb is running, click the devices widget in the upper right panel to expand a listing of all devices detected by Qubes OS.
Now, insert a safe USB device you intend to use with the SecureDrop Workstation. Click the devices widget again. Does the newly attached USB device appear in the list? If so, USB support is working and you can proceed with the installation. If you do encounter the error message “Denied qubes.InputKeyboard from sys-usb to dom0”, you need to additionally enable USB keyboard support:
sudo qubesctl state.sls qvm.usb-keyboard
While we recommend against the use of a USB keyboard for security reasons, this error can also occur in combination with other USB devices on some hardware.
Apply dom0 updates (estimated wait time: 15-30 minutes)
dom0 is the most trusted domain on Qubes OS, and has privileged access to all other qubes. As such, it is important to ensure that all available security updates have been applied to dom0 as the first step after the installation.
After logging in, use the network manager widget in the upper-right panel to configure your network connection.
Open a dom0 terminal from the Qubes Application menu (the icon in the upper left corner) by selecting ▸ (left-hand side) ▸ Other Tools ▸ Xfce Terminal. Run the following command:
sudo qubes-dom0-update -y
Wait for all updates to complete. If you encounter an error during this stage, please contact us for assistance, as it may not be safe to proceed with the installation.
After updating dom0, reboot the workstation to ensure that all updates have taken effect for your active session.
Apply updates to system templates (estimated wait time: 45-60 minutes)
After logging in again, confirm that the network manager successfully connects you to the configured network. If necessary, verify the network settings using the network manager widget.
Next, configure Tor via
▸ Service ▸ sys-whonix ▸ Anon Connection Wizard. In most cases, choosing the default Connect option is best. Click Next, then Next again. Then, if Tor connects successfully, click Finish. If Tor fails to connect, make sure your network conection is up and does not filter Tor connections, then try again.Note
If Tor connections are blocked on your network, you may need to configure Tor to use bridges in order to get a connection. For more information, see the Anon Connection Wizard documentation.
Once Tor has connected, launch the Qubes Update tool via
▸ Qubes Tools ▸ Qubes Update to update the system qubes. in the [Dom0] Qubes Updatewindow, check all entries in the list above except fordom0(which you have already updated in the previous step). Then, click Update. The system qubes will be updated sequentially - this may take some time. When the updates are complete, click Next. You will then be prompted to Finish and restart/shutdown 4 qubes. Go ahead and do so, and allow time for them to restart.
Installing SecureDrop Workstation
Download SecureDrop Workstation packages
First, you must configure the Qubes-Contrib repo, then download the SecureDrop Workstation packages.
Make sure that network connection is enabled using the network manager widget in the upper right panel.
Next, in a
dom0terminal ( ▸ ▸ Other ▸ Xfce Terminal):sudo qubes-dom0-update -y qubes-repo-contrib sudo qubes-dom0-update --clean -y securedrop-workstation-keyring
The SecureDrop Relase keyring will be installed on your machine. Wait 15 seconds for the key to be imported into the
rpmdatabase. Then:sudo qubes-dom0-update --clean -y securedrop-workstation-dom0-config sudo dnf -y remove qubes-repo-contrib
Import KeePassXC database
If you have a KeePassXC database on your Tails-based Admin Workstation USB flash drive, you should copy it to the vault qube on the new Qubes-based Admin Workstation.
Qubes OS comes with the KeePassXC password manager preinstalled in the vault qube.
Open the KeePassXC program
 in the
 vaultqubeSelect Database ▸ Open database, and navigate to the location of /path/to/Passwords.kdbx, select it, and click Open
Leave the password blank and click OK. If you receive an “Unlock failed” prompt, click Retry with empty password.
Edit entries as required.
Select Database ▸ Save Database to save your changes.
The next time you use KeepassXC in vault, the database at /path/to/Passwords.kdbx
will be selected by default.
KeePassXC will show a warning every time you attempt to open a database without entering a password. Because your persistent volume is encrypted, setting up this additional password is not strictly required. It provides some additional protection, e.g., if a computer is left running, at the cost of convenience.
For passwordless access without warnings, you can protect the database using a key file, via Database ▸ Database settings ▸ Security ▸ Add additional protection ▸ Add Key File ▸ Generate. This key file has to be stored in your Persistent folder and it must be selected when you open the database.
After configuring the password database, restart KeePassXC once to verify that you are able to access it as expected.
Warning
You will not be able to access your passwords if you forget the full disk encryption or the location of the key file used to protect the database.
Configure SecureDrop Workstation
Now that your new Qubes-based Admin Workstation is prepared, you can proceed with importing the correct SecureDrop server details and Submission Private Key from your Tails-based Journalist Workstation and Secure Viewing Station USB flash drives.
Import Submission Private Key
In order to decrypt submissions, you will need a copy of the Submission Private Key from your SecureDrop instance’s Secure Viewing Station.
To protect this key and preserve the air gap, you will need to connect the Secure Viewing Station USB flash drive to a qube with no network access, and copy it from there to dom0. You cannot directly copy and paste to the dom0 qube from another qube - instead, follow the steps below:
First, use the network manager widget in the upper right panel to disable your network connection. These instructions refer to the
vaultqube, which has no network access by default, but if the Secure Viewing Station is attached to another qube by mistake, this will offer some protection against exfiltration.Next, choose
▸ Apps ▸ vault ▸ Thunar File Manager to open the file manager in the vaultqube.Connect the Secure Viewing Station USB flash drive to a USB port on the Qubes computer, then use the devices widget in the upper right panel to attach it to the
vaultqube. There will be three entries for the USB flash drive in the section titled Data (Block) Devices. Choose the unlabeled entry (not the one labeled “TAILS”) annotated with asys-usbtext that ends with a number, likesys-usb:sdb2. That is the persistent volume.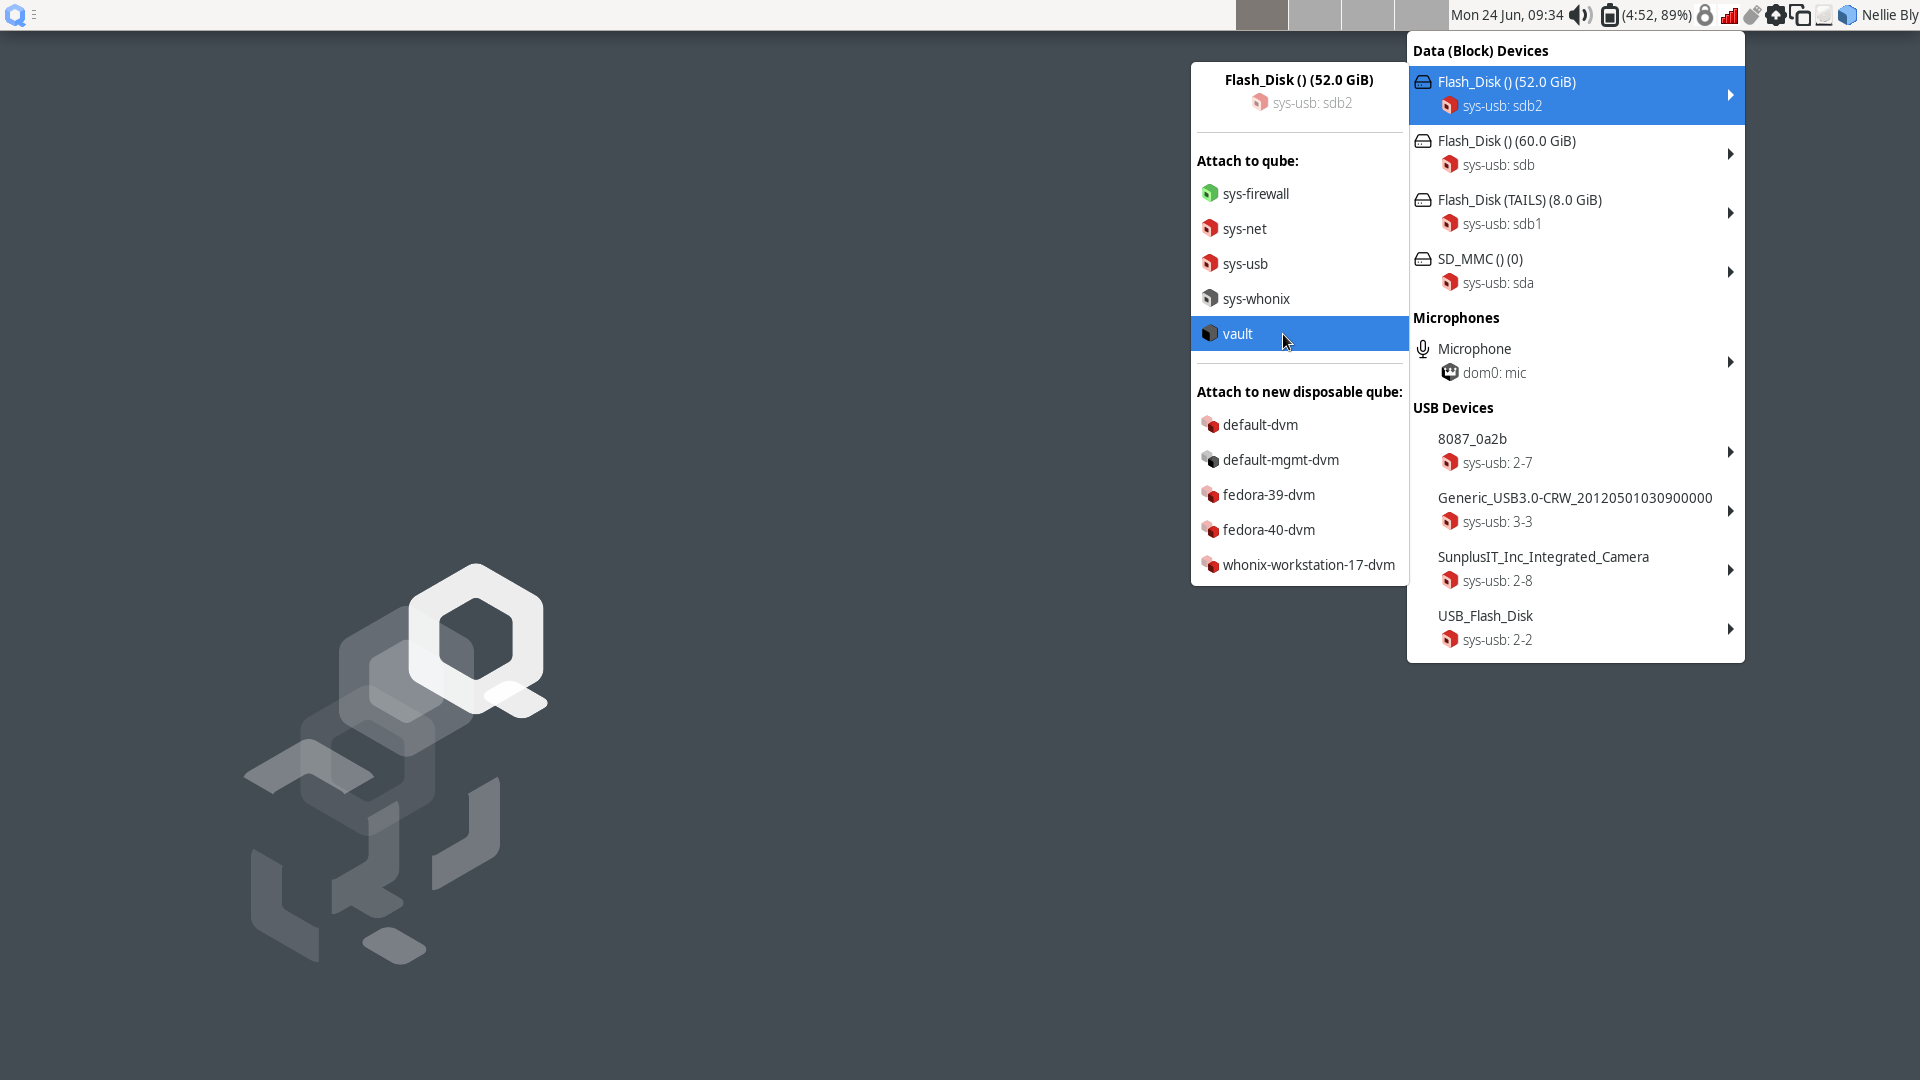
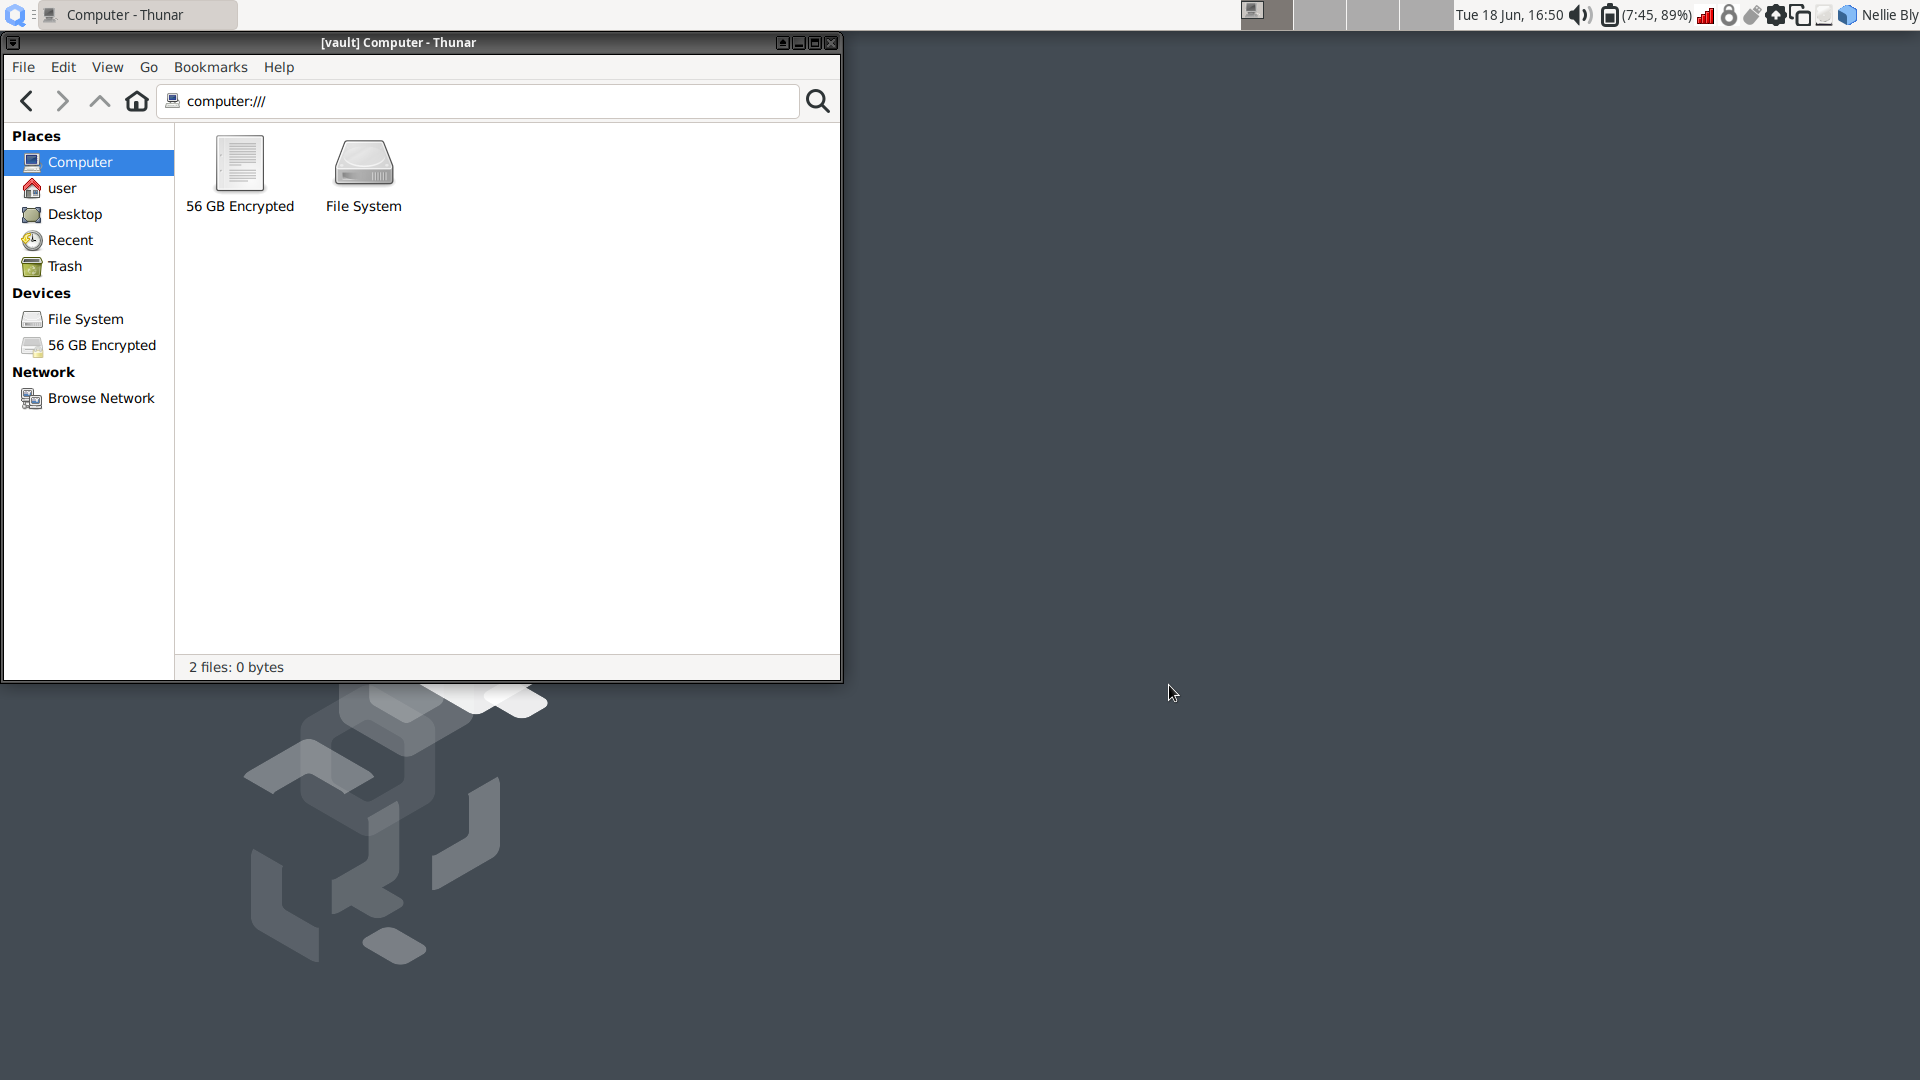
In the the
vaultfile manager, select the persistent volume’s listing in the lower left sidebar. It will be namedN GB encrypted, where N is the size of the persistent volume. Enter the Secure Viewing Station persistent volume passphrase to unlock and mount it. When asked if you would like to forget the password immediately or remember it until you logout, choose the option to Forget password immediately.Note
You will receive a message that says Failed to open directory “TailsData”. This is normal behavior and will not cause any issues with the subsequent steps.
Open a
dom0terminal via ▸ ▸ Other ▸ Xfce Terminal. Once the terminal window opens, run the following command to import the Submission Private Key:sdw-admin --configureFollow the command prompts to complete Submission Private Key import.
Note
If there are multiple keys present on the device,
sdw-admin --configurewill print the fingerprints of those keys for you to select which to use as the Submission Private Key. You can open<source interface address>.onion/metadatain Tor Browser on another network-connected computer to check the correct key fingerprint used by your SecureDrop instance.Once the Submission Private Key import is complete, in the
vaultfile manager, right-click on the TailsData sidebar entry, then select Unmount and disconnect the Secure Viewing Station USB flash drive.If you were prompted for a passphrase during import, you will now need to remove the passphrase on
sd-journalist.sec. See Removing the passphrase from a GPG key.
Import Admin Interface details
SecureDrop Workstation connects to your SecureDrop instance’s API via the Admin Interface. In order to do so, it will need the Admin Interface address and authentication info. As the clipboard from another qube cannot be copied into dom0 directly, follow these steps to copy the file into place:
Locate a Tails-based Admin Workstation or Journalist Workstation USB flash drive. Both hold the address and authentication info for the Admin Interface; if you also want to copy the Journalist’s password database, use the Journalist Workstation USB flash drive.
Connect the USB flash drive to a USB port on the Qubes computer, then use the devices widget in the upper right panel to attach it to the
vaultqube. There will be 3 listings for the USB flash drive in the widget: one for the base drive, one for the Tails partition (labeledTails), and a 3rd unlabeled listing (for the persistent volume). Choose the third listing.In the the
vaultfile manager, select the persistent volume’s listing in the lower left sidebar. It will be namedN GB encrypted, where N is the size of the persistent volume. Enter the persistent volume passphrase to unlock and mount it. When prompted, select the option to Forget password immediately.In the
dom0terminal, proceed with the next import step of thesdw-admincommand or re-runsdw-admin --configureThe command will print out the imported Admin Interface details to confirm before proceeding.
If you used a Tails-based Admin Workstation drive, or you don’t intend to copy a password database to this workstation, safely disconnect the USB flash drive now. In the
vaultfile manager, right-click on the TailsData sidebar entry, then select Unmount and disconnect the USB flash drive.
Copy SecureDrop login credentials
When launching SecureDrop Inbox must enter their username, passphrase and two-factor code to connect with the SecureDrop server. You can manage these passphrases using the KeePassXC password manager in the vault qube. If this laptop will be used by more than one Journalist, we recommend that you shut down the vault qube now (using the Qube widget in the upper right panel), skip this section, and use a smartphone password manager instead.
In order to set up KeePassXC for easy use:
Add KeePassXC to the application menu by selecting it from the list of available apps in
▸ Apps ▸ vault ▸ Settings ▸ Applications and pressing the button labeled > (do not press the button labeled >>, which will add all applications to the menu).Launch KeePassXC via
▸ Apps ▸ vault ▸ KeePassXC. When prompted to enable automatic updates, decline. vaultis networkless, so the built-in update check will fail; the app will be updated through system updates instead.Close the application.
Important
The password database from the Tails-based Admin Workstation contains sensitive credentials not required by Journalists. Make sure to copy the credentials from the Tails-based Journalist Workstation USB flash drive.
In order to copy a Journalist’s login credentials:
If a Tails-based Journalist Workstation USB flash drive is not currently attached, connect it, attach it to the
vaultqube, open it in the file manager, and enter its encryption passphrase.Locate the password database. It should be in the
Persistentdirectory, and will typically be namedkeepassx.kdbxor similar.Open a second
vaultfile manager window (Ctrl + Nin the current window) and navigate to the Home directory.Drag and drop the password database to copy it.
In the
vaultfile manager, right-click on the TailsData sidebar entry, then select Unmount and disconnect the Journalist Workstation USB flash drive. Close this file manager window.In the file manager window that displays the home directory, open the copy you made of the password database by double-clicking it.
If the database is passwordless, KeePassXC may display a security warning when opening it. To preserve convenient passwordless access, you can protect the database using a key file, via Database ▸ Database settings ▸ Security ▸ Add additional protection ▸ Add Key File ▸ Generate. This key file has to be selected when you open the database, but KeePassXC will remember the last selection.
Inspect each section of the password database to ensure that it contains only the information required by the Journalist to log in.
Close the application window and shut down the
vaultqube (using the Qube widget in the upper right panel). At this time, you can also re-enable the network connection using the network manager widget.
Manually importing from Tails drives
Manually import Submission Private Key
If importing the Submission Private Key using sdw-admin --configure fails, you can also copy the Submission Private Key manually.
Open a
dom0terminal via ▸ ▸ Other Tools ▸ Xfce Terminal. Once the terminal window opens, run the following command to list the Submission Private Key details, including its fingerprint:qvm-run --pass-io vault \ "gpg --homedir /run/media/user/TailsData/gnupg -K --fingerprint"
Next, run the comand:
qvm-run --pass-io vault \
  "gpg --homedir /run/media/user/TailsData/gnupg --export-secret-keys --armor <SVSFingerprint>" \
  > /tmp/sd-journalist.sec
where
<SVSFingerprint>is the Submission Private Key fingerprint, typed as a single unit without whitespace. This will copy the Submission Private Key in ASCII format to a temporary file in dom0,/tmp/sd-journalist.sec.Verify the that the file starts with
-----BEGIN PGP PRIVATE KEY BLOCK-----using the command:head -n 1 /tmp/sd-journalist.sec
Unmount the Secure Viewing Station USB flash drive.
Run the following command in the
dom0terminal:sudo cp /tmp/sd-journalist.sec /usr/share/securedrop-workstation-dom0-config/
You can run
sdw-admin --configureto now import the Admin Interface details and complete configuration.Alternatively, follow the steps below to do so manually. Once both Submission Private Key and Admin Interface details are imported, proceed with configuring the workstation.
Manually import Admin Interface details
If importing the Admin Interface details using sdw-admin --configure fails, you can copy the configuration file to dom0 manually.
If your Admin Interface is based on SecureDrop 2.13.0 or later, use the following command:
qvm-run --pass-io vault \
  "cat /run/media/user/TailsData/securedrop-admin/app-journalist.auth_private" \
  > /tmp/journalist.txt
If your Admin Interface is based on SecureDrop 2.12.10 or earlier, use the following command:
qvm-run --pass-io vault \
        "cat /run/media/user/TailsData/Persistent/securedrop/install_files/ansible-base/app-journalist.auth_private" \
  > /tmp/journalist.txt
Verify that the
/tmp/journalist.txtfile ondom0contains valid configuration information using the commandcat /tmp/journalist.txtin thedom0terminal.Proceed with configuring the workstation
If you encounter a validation error due to a password-protected GPG key, see Removing the passphrase from a GPG key.
Once the Admin Interface details and Submission Private Key have been copied to dom0, you can create the configuration for the SecureDrop Workstation.
Your Submission Private Key has a unique fingerprint required for the configuration. Obtain the fingerprint by using this command:
gpg --with-colons --import-options import-show --dry-run --import /tmp/sd-journalist.sec
The fingerprint will be on a line that starts with
fpr. For example, if the output included the linefpr:::::::::65A1B5FF195B56353CC63DFFCC40EF1228271441:, the fingerprint would be the character sequence65A1B5FF195B56353CC63DFFCC40EF1228271441.Next, create the SecureDrop Workstation configuration file:
cd /usr/share/securedrop-workstation-dom0-config
sudo cp config.json.example config.json
The
config.jsonfile must be updated with the correct values for your instance. Open it with root privileges in a text editor such asviornanoand update the following fields’ values:submission_key_fpr: use the value of the Submission Private Key fingerprint as displayed above
hidserv.hostname: use the hostname of the Admin Interface, including the
.onionTLDhidserv.key: use the private v3 Onion Service authorization key value
environment: use the value
prod
Note
You can find the values for the hidserv.* fields in the /tmp/journalist.txt file that you created in dom0 earlier.
The file will be formatted as follows:
ONIONADDRESS:descriptor:x25519:AUTHTOKEN
Verify that the configuration is valid using the command below in the
dom0terminal:sdw-admin --validate
Configure SecureDrop Workstation
These steps should be performed from a
dom0terminal. Start a dom0 terminal via ▸ ▸ Other Tools ▸ Xfce Terminal.Configure infinite scrollback for your terminal via Edit ▸ Preferences ▸ General ▸ Unlimited scrollback. This helps to ensure that you will be able to review any error output printed to the terminal during the installation.
Finally, in the
dom0terminal, run the command:sdw-admin --apply
This command will take a considerable amount of time and approximately 4GB of bandwidth, as it sets up multiple qubes and installs supporting packages. When the command finishes, reboot the machine to complete the installation. This SecureDrop Workstation is finally ready to use!
Test the SecureDrop Workstation
The preflight updater will start automatically after logging into the system. Please follow the preflight updater’s instructions.
Note
If you close SecureDrop Inbox during your session, you can launch it again using the SecureDrop icon on the desktop.
Once the update check is complete, SecureDrop Inbox will launch. Log in using an existing journalist account and verify that Sources are listed and submissions can be downloaded, decrypted, and viewed.
Enable password copy and paste
If you use KeePassXC in the vault qube to manage login credentials, you can enable the user to copy passwords to SecureDrop Inbox using inter-qube copy and paste. While this is relatively safe, we recommend reviewing the section Managing Clipboard Access of this guide, which goes into further detail on the security considerations for inter-qube copy and paste.
The password manager runs in the networkless vault qube, and the SecureDrop Inbox application runs in the sd-app qube. To permit this one-directional clipboard use, issue the following command in dom0:
qvm-tags vault add sd-send-app-clipboard
Confirm that the tag was correctly applied using the ls subcommand:
qvm-tags vault ls
To revoke this configuration change later or correct a typo, you can use the del subcommand, e.g.:
qvm-tags vault del sd-send-app-clipboard
Troubleshooting sdw-admin
“Failed to return clean data”
An error similar to the following may be displayed during an installation or update:
sd-log:
      ----------
      _error:
          Failed to return clean data
      retcode:
          None
      stderr:
      stdout:
          deploy
This is a transient error that may affect any of the SecureDrop Workstation qubes. To clear it, run the installation command or update again.
“Temporary failure resolving”
Transient network issues may cause an installation to fail. To work around this, verify that you have a working Internet connection, and re-run the sdw-admin --apply command.